If you’re a beginner web developer, you might have noticed numerous login forms while browsing the web. Have you ever wondered how to create one yourself using only HTML and CSS? It’s definitely possible to design a functional login form with just these two languages.
In this blog post, I’ll walk you through creating a straightforward yet effective login form using only HTML and CSS. We’ll begin by setting up the HTML structure and then use CSS to style it. To give the form a modern touch, we’ll also include Google and Apple login buttons.
We’ll utilize standard HTML elements like `<form>`, `<div>`, `<a>`, `<label>`, and `<button>`, along with basic CSS properties for styling. This project is designed to be simple and easy to follow. Let’s dive in!
Steps to Create Simple Login Form in HTML and CSS
To create a straightforward yet effective login form using only HTML and CSS, follow these easy step-by-step instructions:
- First, create a folder with a name of your choice, such as `login-form`. Inside this folder, create the following files:1. **`index.html`** – This will be your main HTML file.
2. **`style.css`** – This file will contain your CSS styles.Lastly, download the `Images` folder and place it in your project directory. This folder includes the logos for Google and Apple used in the form project.
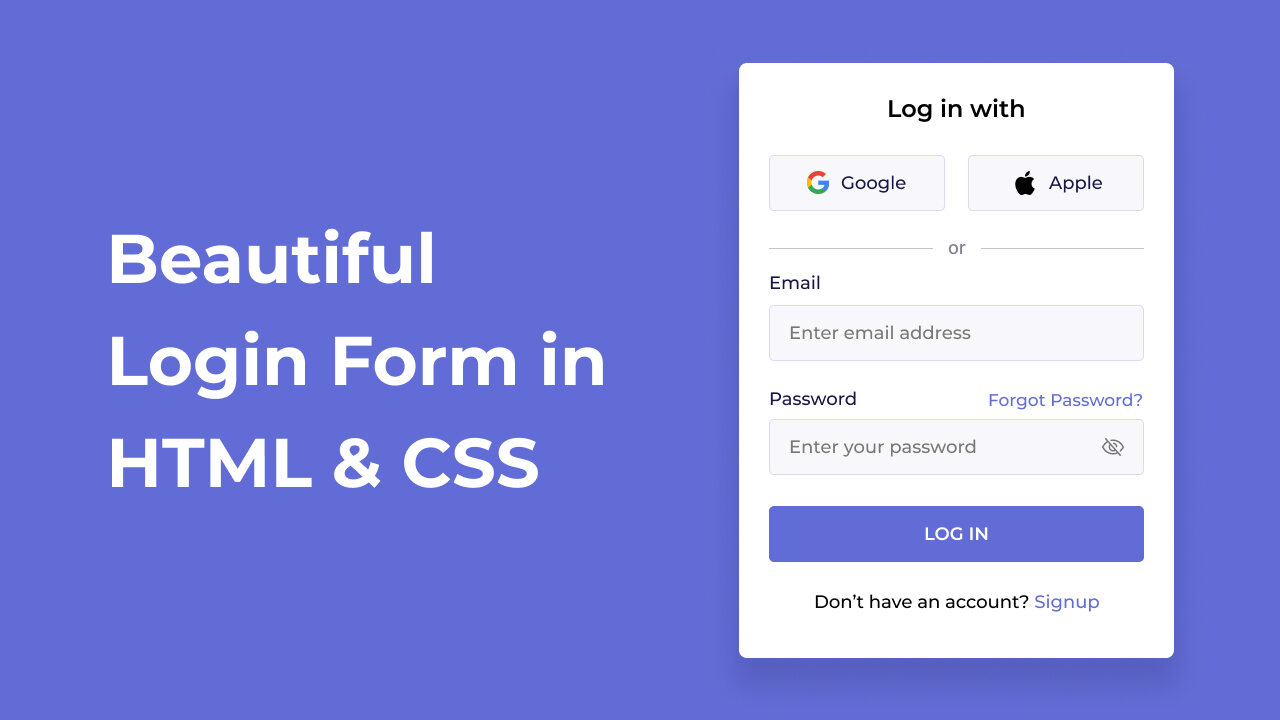
To begin, insert the following HTML code into your `index.html` file. This code includes key HTML elements such as `<form>`, `<div>`, `<a>`, `<label>`, and `<button>`, which will help you create the layout for the login form.
<!DOCTYPE html>
<html lang="en">
<head>
  <meta charset="UTF-8" />
  <meta name="viewport" content="width=device-width, initial-scale=1.0" />
  <title>Login Form in HTML and CSS | TutorialRays </title>
  <link rel="stylesheet" href="style.css" />
</head>
<body>
  <div class="login_form">
    <!-- Login form container -->
    <form action="#">
      <h3>Log in with</h3>

      <div class="login_option">
        <!-- Google button -->
        <div class="option">
          <a href="#">
            <img src="logos/google.png" alt="Google" />
            <span>Google</span>
          </a>
        </div>

        <!-- Apple button -->
        <div class="option">
          <a href="#">
            <img src="logos/apple.png" alt="Apple" />
            <span>Apple</span>
          </a>
        </div>
      </div>

      <!-- Login option separator -->
      <p class="separator">
        <span>or</span>
      </p>

      <!-- Email input box -->
      <div class="input_box">
        <label for="email">Email</label>
        <input type="email" id="email" placeholder="Enter email address" required />
      </div>

      <!-- Paswwrod input box -->
      <div class="input_box">
        <div class="password_title">
          <label for="password">Password</label>
          <a href="#">Forgot Password?</a>
        </div>

        <input type="password" id="password" placeholder="Enter your password" required />
      </div>

       <!-- Login button -->
      <button type="submit">Log In</button>

      <p class="sign_up">Don't have an account? <a href="#">Sign up</a></p>
    </form>
  </div>
</body>
</html
Next, add the following CSS code to your `style.css` file to style your login form. You can experiment with various CSS properties like colors, fonts, and backgrounds to enhance the appearance of your form.
family=Montserrat:ital,wght@0,100..900;1,100..900&display=swap');
/* Resetting default styling and setting font-family */
* {
    margin: 0;
    padding: 0;
    box-sizing: border-box;
    font-family: "Montserrat", sans-serif;
}
body {
    width: 100%;
    min-height: 100vh;
    padding: 0 10px;
    display: flex;
    background: #626cd6;
    justify-content: center;
    align-items: center;
}
/* Login form styling */
.login_form {
    width: 100%;
    max-width: 435px;
    background: #fff;
    border-radius: 6px;
    padding: 41px 30px;
    box-shadow: 0 10px 20px rgba(0, 0, 0, 0.15);
}
.login_form h3 {
    font-size: 20px;
    text-align: center;
}
/* Google & Apple button styling */
.login_form .login_option {
    display: flex;
    width: 100%;
    justify-content: space-between;
    align-items: center;
}
.login_form .login_option .option {
    width: calc(100% / 2 - 12px);
}
.login_form .login_option .option a {
    height: 56px;
    display: flex;
    justify-content: center;
    align-items: center;
    gap: 12px;
    background: #F8F8FB;
    border: 1px solid #DADAF2;
    border-radius: 5px;
    margin: 34px 0 24px 0;
    text-decoration: none;
    color: #171645;
    font-weight: 500;
    transition: 0.2s ease;
}
.login_form .login_option .option a:hover {
    background: #ededf5;
    border-color: #626cd6;
}
.login_form .login_option .option a img {
    max-width: 25px;
}
.login_form p {
    text-align: center;
    font-weight: 500;
}
.login_form .separator {
    position: relative;
    margin-bottom: 24px;
}
/* Login option separator styling */
.login_form .separator span {
    background: #fff;
    z-index: 1;
    padding: 0 10px;
    position: relative;
}
.login_form .separator::after {
    content: '';
    position: absolute;
    width: 100%;
    top: 50%;
    left: 0;
    height: 1px;
    background: #C2C2C2;
    display: block;
}
form .input_box label {
    display: block;
    font-weight: 500;
    margin-bottom: 8px;
}
/* Input field styling */
form .input_box input {
    width: 100%;
    height: 57px;
    border: 1px solid #DADAF2;
    border-radius: 5px;
    outline: none;
    background: #F8F8FB;
    font-size: 17px;
    padding: 0px 20px;
    margin-bottom: 25px;
    transition: 0.2s ease;
}
form .input_box input:focus {
    border-color: #626cd6;
}
form .input_box .password_title {
    display: flex;
    justify-content: space-between;
    text-align: center;
}
form .input_box {
    position: relative;
}
a {
    text-decoration: none;
    color: #626cd6;
    font-weight: 500;
}
a:hover {
    text-decoration: underline;
}
/* Login button styling */
form button {
    width: 100%;
    height: 56px;
    border-radius: 5px;
    border: none;
    outline: none;
    background: #626CD6;
    color: #fff;
    font-size: 18px;
    font-weight: 500;
    text-transform: uppercase;
    cursor: pointer;
    margin-bottom: 28px;
    transition: 0.3s ease;
}
form button:hover {
    background: #4954d0;
}
That’s it! If you’ve added the code correctly, you’re all set to view your login form. Open the `index.html` file in your preferred browser to see your login form in action.
Conclusion and final words
Creating a login form is an excellent way for beginners to learn the fundamentals of HTML and CSS, and to gain hands-on experience in designing and styling forms. By following the steps and code provided in this blog post, you’ve successfully built your own login form.
To further develop your web development skills, especially with forms, try recreating other attractive login and registration forms featured on this site. Many of these forms incorporate JavaScript to add advanced features such as password visibility toggling, password strength checking, and form validation.
If you run into any issues while building your login form, you can download the source code files for this project for free by clicking the “Download” button. You can also view a live demo by clicking the “View Live” button.


