
AI Reading
Quick summary of this article
This article explains how to integrate Razorpay, a popular payment gateway in India, into a Flutter mobile app with support for UPI and wallet payments. It covers adding the Razorpay dependency, configuring Android permissions, and provides a complete code example to handle payments, including success and error callbacks. The guide emphasizes that UPI payments require a real Android device and offers tips for testing with test UPI IDs before going live.
- Add the
razorpay_flutterpackage to yourpubspec.yamland runflutter pub get. - Enable internet permission in
AndroidManifest.xmland ensure yourMainActivityextendsFlutterActivity. - Use a real Android device for testing UPI; it does not work on emulators or web browsers.
- Test payments with Razorpay's test UPI IDs like
success@razorpayorfailure@razorpay. - Before going live, replace the test key with your live Razorpay key and consider server-side order verification.
If you’re building a Flutter app and want to add payment functionality using Razorpay, you’re in the right place. This guide walks you through integrating Razorpay with UPI and wallet support, making it easy for users in India to pay using their favorite UPI apps like Google Pay, PhonePe, or Paytm.
Why Razorpay?
Razorpay is one of the most developer-friendly and widely used payment gateways in India. It supports multiple payment methods including:
- Credit/Debit Cards
- UPI
- Netbanking
- Wallets
Prerequisites
- Flutter installed and set up
- Razorpay account (you can create one at razorpay.com)
- Android device for testing (UPI does not work on simulators or Flutter Web)
Step 1: Add Razorpay Dependency
Open your pubspec.yaml and add the Razorpay package:
dependencies:
  flutter:
    sdk: flutter
  razorpay_flutter: ^1.4.0
Then run:
flutter pub getStep 2: Android Configuration
Edit android/app/src/main/AndroidManifest.xml to add internet permission:
<uses-permission android:name="android.permission.INTERNET"/>Make sure your MainActivity extends FlutterActivity (default for new Flutter projects).
Step 3: Full Flutter Code
Here’s a complete example to get you up and running quickly:
import 'package:flutter/material.dart';
import 'package:razorpay_flutter/razorpay_flutter.dart';

class RazorpayPaymentPage extends StatefulWidget {
  @override
  _RazorpayPaymentPageState createState() => _RazorpayPaymentPageState();
}

class _RazorpayPaymentPageState extends State<RazorpayPaymentPage> {
  late Razorpay _razorpay;

  @override
  void initState() {
    super.initState();
    _razorpay = Razorpay();
    _razorpay.on(Razorpay.EVENT_PAYMENT_SUCCESS, _handlePaymentSuccess);
    _razorpay.on(Razorpay.EVENT_PAYMENT_ERROR, _handlePaymentError);
    _razorpay.on(Razorpay.EVENT_EXTERNAL_WALLET, _handleExternalWallet);
  }

  void _openCheckout() {
    var options = {
      'key': 'rzp_test_BCnPKzbqHuav3k', // Replace with your Test Key
      'amount': 50000, // in paise => 500 INR
      'currency': 'INR',
      'name': 'Test Payment',
      'description': 'UPI/Razorpay Test Payment',
      'prefill': {
        'contact': '9123456789',
        'email': 'test@razorpay.com'
      },
      'method': {
        'upi': true,
      },
      'external': {
        'wallets': ['paytm']
      }
    };

    try {
      _razorpay.open(options);
    } catch (e) {
      debugPrint('Error: $e');
    }
  }

  void _handlePaymentSuccess(PaymentSuccessResponse response) {
    debugPrint("\u2705 PAYMENT SUCCESS: \${response.paymentId}");
    ScaffoldMessenger.of(context).showSnackBar(
      SnackBar(content: Text("Payment Successful! ID: \${response.paymentId}")),
    );
  }

  void _handlePaymentError(PaymentFailureResponse response) {
    debugPrint("\u274C PAYMENT FAILED: \${response.code} - \${response.message}");
    ScaffoldMessenger.of(context).showSnackBar(
      SnackBar(content: Text("Payment Failed! \${response.message}")),
    );
  }

  void _handleExternalWallet(ExternalWalletResponse response) {
    debugPrint("\ud83d\udcbc EXTERNAL WALLET: \${response.walletName}");
    ScaffoldMessenger.of(context).showSnackBar(
      SnackBar(content: Text("External Wallet: \${response.walletName}")),
    );
  }

  @override
  void dispose() {
    _razorpay.clear();
    super.dispose();
  }

  @override
  Widget build(BuildContext context) {
    return Scaffold(
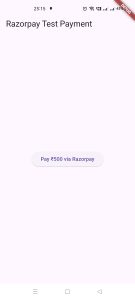
      appBar: AppBar(title: const Text('Razorpay Test Payment')),
      body: Center(
        child: ElevatedButton(
          onPressed: _openCheckout,
          child: const Text('Pay ₹500 via Razorpay'),
        ),
      ),
    );
  }
}
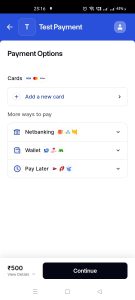
Step 4: Testing
To test payments:
- Use Google Pay / PhonePe / Paytm on your Android device
- Use Razorpay’s test UPI ID like
success@razorpayorfailure@razorpayfor backend simulations - You will see payment results and console logs in your Flutter app
Final Tips
- UPI won’t show up on emulators or web — use a real device
- Don’t manually set
vpafor real UPI flows — Razorpay handles this when switching to UPI apps - Check that UPI is enabled in your Razorpay dashboard (under Settings → Payment Methods)
Going Live
Once you’re done testing:
- Replace
rzp_test_xxxkey with your Live Mode Razorpay key - Follow Razorpay docs for server-side order creation and signature verification (optional but recommended)
Conclusion
With just a few lines of code, you’ve enabled smooth UPI and wallet payments in your Flutter app using Razorpay. This is perfect for Indian users who prefer fast, secure app-based payments.
Let us know if you’d like a follow-up post on handling Razorpay orders from the server or building a full checkout UI!